HEATER CONTROL VALVE REMOVAL/REBUILD/REPLACEMENT
The first problem I encountered during the process of getting the heat to work was with the heater control valve that is located in the cowl under the hood. The valve can be seen from the passenger side of the car. This valve can become frozen in place over the years. Replacements are available but they are very costly. $100+ typical. You CAN rebuild the valve yourself assuming you can get it apart without damaging it.
Leaks are another common problem. Notice in the picture below the original factor hose clamps on the left side of the valve. I HIGHLY suggest that if you have these original clamps, and likely the original 40+ year-old hose, you replace the hose and clamps as soon as possible. This is a commonly overlooked weak link in the restoration of the cooling system.
BEFORE working on the heater control valve or the hearer box, allow the car to cool completely and drain the cooling system.


From personal experience I would suggest dousing the entire heater control valve with a good penetrating oil (Nuts Off, etc.) overnight before attempting removal. I suggest you get a good inspection mirror and become familiar with all of the bits before you dig in.
- Remove the clamp and hose connecting the heater control valve to the back of the cylinder head. (Clamp on right side of valve.)
- If you are are removing the entire heater box as a unit skip to step section on HEATER BOX REMOVAL.
- Remove the clamp(s) on the left side of the heater valve. (If you have original style clamps as pictured above, they are loosened by turning the cotter pin and releasing tension on the clamp. Once you have some slack in the clamp, use cutters to cut the clamp and remove it.)
- The actuating lever and retaining nuts must be removed to gain access to the valve. The back side of the valve can be seen towards the bottom of the picture below.
- Remove the screw that hold the actuating are to the heater control valve. (The screw is in the center of the back of the heater control valve. Carefully pry the arm off the valve. It is not necessary to loosen the nut that connects the cable to the arm.
- The two nuts that hold the heater valve in place are on the back side of the valve and are difficult to reach. Be cautious went removing the nuts. The valve is bolted to a thin plastic extrusion which is VERY fragile. Mine was cracked prior to me attempting removal.


In the picture below you can see I have attempted to use epoxy to glue the broken mounting bracket back together. You can also see the heater control valve actuation arm. This

This is why I recommend to ALWAY replace the short hose between the heater control valve and the heater core. After removing this hose section it literally fell into two pieces.

Once the valve is removed from the car I was able to take it apart and clean it completely. Take notes on how is comeS apart so you can reassemble it correctly. I was able to get new stainless screws and O-rings to rebuild my valve at my local hardware store. I used a small amount of Vaseline during reassembly to lubricate the shaft/O-rings.

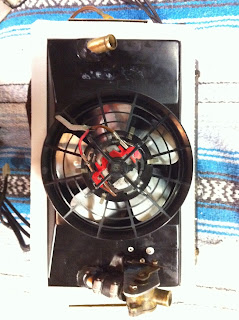
Here is the rebuilt valve reinstalled in the car. Notice the small hose between the heater control valve and the heater core (On left) is new. The clamps used on the short hose on the left are special: They are MUCH thinner than regular hose clamps. These are necessary to seal properly. If you attempt to use regular hose clamps you will have a leak and be VERY annoyed. Take the time, get the correct clamps. The clamp on the right can be a normal hose clamp. I chose to keep them all the same.
Have someone move the HOT/COLD lever inside the care while you check for proper valve operation in the cowl. It is possible to reinstall the actuating arm in the wrong position. Ask me how I know ;-)
If the heater control valve was your only issue, you can refill the cooling system and enjoy the heat.

HEATER CONTROL VALVE MOUNTING BRACKET REPLACEMENT
If you heater control valve mounting bracket was broken and you plan on rebuilding the heater box, this is a simple fix. You can easily fabricate a replacement bracket from 1/8" aluminum. The pictures below detail how I made mine. I made a paper template first and then transferred the dimension to the aluminum.

Notice the difference from the picture above. I used a Dremel to remove the original plastic mount completely and to cut a slot into the heater box for the replacement mount.


New aluminum heater control valve mounting bracket installed. I used 1/8" aluminum rivets to mount the new bracket.


HEATER BOX REMOVAL
HEATER BOX REBUILD


No comments:
Post a Comment